7 Common Canva Wedding Invitation Printing Mistakes Provo Brides Make and How to Fix Them
Avoid the most common mistakes Provo brides make when printing Canva wedding invitations - from wrong file format to low resolution photos.

January 5, 2026
Learning the 7 common Canva wedding invitation printing mistakes will save you immense frustration. Dragging and dropping a gorgeous layout on a screen feels simple, only to have the physical copies arrive with flat colors or sliced-off text. For Provo couples on a 5-week BYU engagement timeline, that kind of error is a real problem - there is no time to redo a print run.
As a professional print service in Provo, we see this exact scenario play out every single week. Whether you are a UVU bride hosting an Edgemont backyard reception or a Provo couple sealing at the Provo City Center Temple, the disappointment of a botched print run is identical.
According to 2026 data from Joy, a standard 100-guest stationery suite averages $500 to $800. Wasting that kind of budget on avoidable errors hurts even more when you are stretching for tuition and a wedding in the same semester.
Let us look at the technical details behind these formatting failures. We will explore the exact adjustments needed to protect your design before you send anything to the presses.
The 7 Common Canva Wedding Invitation Printing Mistakes
Before adjusting your canvas settings, it helps to understand the true financial stakes of commercial production. Skipping vital quality checks often leads to distorted graphics and unexpected white borders. Addressing these errors early preserves your stationery budget and keeps your event timeline on track.
1. Wrong Export Format
The standard download button often leads to the biggest headache. Downloading a detailed file as a basic PNG or JPG graphic is a surefire way to lose quality.
The Mistake: Exporting your final artwork as a simple web image instead of a true PDF Print file.
Why It Matters: Basic image formats compress data heavily to save storage space. This strips away the necessary resolution and bleed dimensions required by commercial printing equipment.
Insider Tip: Always prioritize the “PDF Print” format, which locks in the 300 DPI resolution needed for perfectly sharp typography.
The Fix: Follow these specific steps for a flawless export:
- Click the “Share” button in the top right corner.
- Select “Download” from the dropdown menu.
- Change the file type to “PDF Print” instead of the default PNG.
- Check the boxes for “Crop marks and bleed” and “Flatten PDF”.
That flattening step is critical. It merges your text and transparent graphics into a single static layer. This prevents commercial pre-press software like Adobe Acrobat from accidentally shifting your fonts during processing.
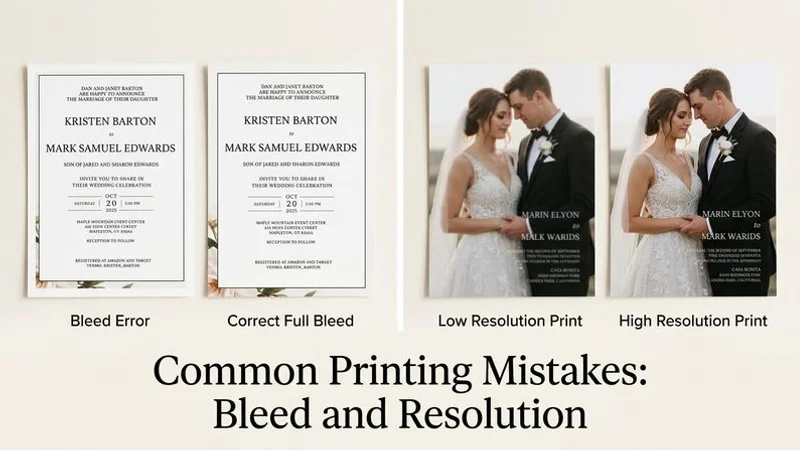
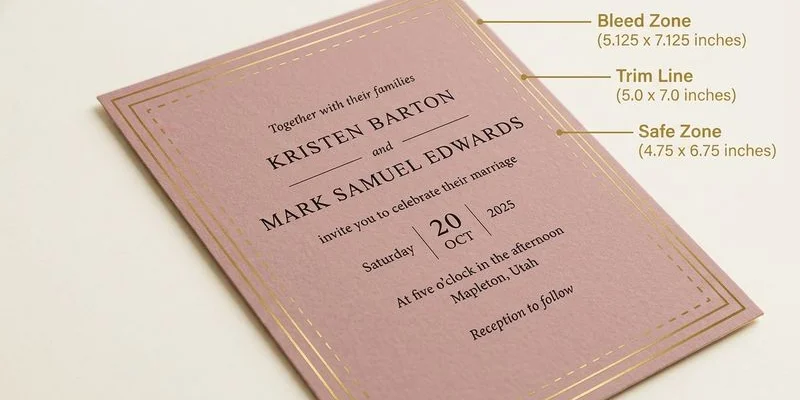
2. Missing Bleed Margins
Failing to extend background colors past the actual size of the card creates an incredibly frustrating visual flaw.
The Mistake: Your background pattern stops exactly at the final trim line.
Pro Tip: The standard bleed requirement for commercial printing in the US is always 0.125 inches (3mm) on all four sides of the document.
Why It Matters: Industrial guillotine cutters process hundreds of sheets at once, and the paper inevitably shifts. According to standard US printing tolerances, a blade can shift by up to 1/16 of an inch during production. If your background stops right at the edge, that tiny mechanical shift will expose a harsh white stripe down the side of your card.
The Fix: A standard 0.125-inch margin of extra artwork beyond the final cut line acts as a safety buffer.
To enable this in Canva:
- Go to the “File” menu at the top of your screen.
- Select “View settings” from the dropdown.
- Click “Show print bleed” to reveal the dashed boundary.
- Stretch all background photos completely out to that dashed line.
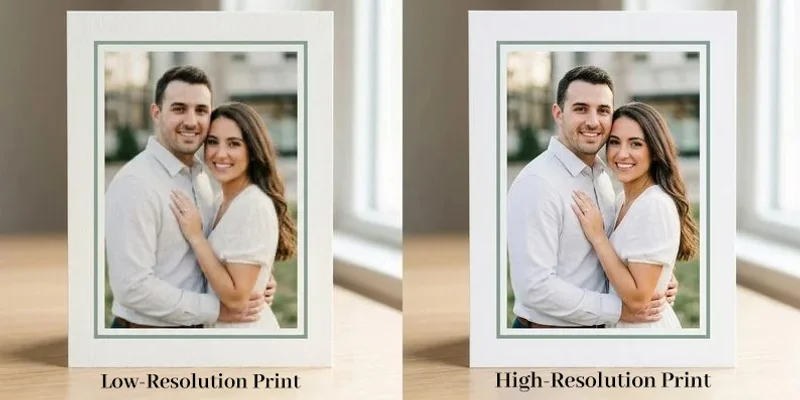
3. Low Resolution Photos
A photo of your engagement up Provo Canyon or at Bridal Veil Falls might look crystal clear on a smartphone screen but turn into a fuzzy mess on paper.
The Mistake: Uploading heavily cropped images or pictures downloaded directly from social media feeds.
Why It Matters: Digital monitors display graphics at 72 DPI (Dots Per Inch), while commercial presses require a density of 300 DPI. A small file simply lacks the pixel density needed to spread ink sharply across physical cardstock.
| Format Type | Required Density | Minimum Pixel Dimensions | Visual Result |
|---|---|---|---|
| Digital Screen | 72 DPI | 360 x 504 pixels | Sharp on phones |
| Commercial Print | 300 DPI | 1500 x 2100 pixels | Crisp on paper |
The Fix: Always upload the original, full-sized image files directly from your photographer. Avoid pulling images from text messages, Instagram, or AirDrop, since those services aggressively compress files. Many Provo photographers deliver originals via Pixieset or Dropbox - those are the files to use.
4. Text Too Close to the Edge
Pushing words out to the absolute perimeter of the layout creates a massive risk during the final trimming phase.
The Mistake: Positioning vital information like the couple’s names, the venue address, or the date within 0.25 inches of the physical edge.
Why It Matters: Just as the paper shifts slightly outward to create white edges, it can also shift inward. Any letters sitting right on the cutting path will get sliced in half.
The Fix: Respect the established “safe zone” for all vital typography. Standard margin rules:
- Keep all primary text at least 0.25 inches away from the trim line.
- Center important venue details securely in the middle of the layout.
- In Canva, go to “File”, select “View settings”, and click “Show margins” to display the built-in safety border.
- Only extend decorative elements into the outer margins if you accept they might get clipped.
Quality assurance protocols always check this specific spacing before sending anything to the cutting floor.
5. Using RGB Colors Instead of CMYK
Colors behave very differently depending on whether they are emitted by a glowing screen or absorbed by paper.
The Mistake: Designing the entire project in an RGB color profile and expecting a perfect match on a physical press.
Why It Matters: Monitors mix Red, Green, and Blue light to create vibrant hues. Commercial presses mix Cyan, Magenta, Yellow, and Key (Black) ink. The CMYK spectrum is physically smaller than the RGB spectrum, causing bright royal blues or neon greens to convert to duller shades on paper - a real disappointment when you spent hours perfecting that exact shade of dusty rose for your Provo Canyon-themed invitation.
Insider Warning: As of 2026, users on the free Canva plan can only export files in the RGB color profile. You must upgrade to a Pro account to unlock the native CMYK export feature.
The Fix: Be prepared for slight color shifts during the transition from digital to physical media.
If exact color matching is critical for your theme, request a hard color proof. Janet runs a rigorous preflight check to identify any extreme color shifts before running the full batch. This proactive step saves valuable time and resources on a tight Utah Valley engagement.
6. Wrong Canvas Size
Starting your project with an arbitrary dimension is the fastest way to ruin a beautifully crafted layout.
The Mistake: Selecting a default template meant for digital marketing, like a 1080x1080 pixel Instagram post, and trying to stretch it onto a rectangular card.
Why It Matters: Aspect ratios do not stretch evenly. If you design a square graphic and attempt to print it on a 5x7 inch sheet, the image will either stretch into a distorted mess or leave massive white bars on the top and bottom.
Match your digital canvas directly to standard US mailing envelopes right from the start. This simple habit guarantees a perfect fit.
| US Envelope Size | Required Canvas Dimensions | Common Use Case |
|---|---|---|
| A7 Envelope | 5 x 7 inches | Standard formal invitations |
| A2 Envelope | 4.25 x 5.5 inches | RSVP cards and thank you notes |
| A1 Envelope | 3.5 x 5 inches | Detail inserts and small response cards |
The Fix: Always generate a custom size at the very beginning of the process. Click “Create a design,” select “Custom size,” change the measurement unit to inches, and type in 5 for the width and 7 for the height.
7. Not Getting a Proof Before Printing
Sending a massive file straight to a print shop without a preliminary review is a financial gamble - especially with a 250-guest Provo reception order on the line.
The Mistake: Approving a print run of 250 copies based solely on a quick glance at your monitor.
Why It Matters: Finding a crucial typo or a blurry image after the batch is printed means starting completely over. With average US invitation budgets hitting $500 to $800 in 2026 according to The Wedding Report, a total reprint is a painful expense - and it eats the days you do not have on a 5-week BYU engagement.
A thorough proofing process catches several critical errors:
- Resolution problems with imported graphics.
- Missing bleeds that would ruin the final trim.
- Unintended color shifts from RGB to CMYK.
- Typography positioned too close to the cutting path.
- Misspellings of “Provo City Center Temple” or “Mount Timpanogos” - both very common.
The Fix: Always demand a dedicated review phase before giving the final green light.
A soft proof is a digital PDF that highlights margin and color errors, while a hard proof is a physical copy mailed directly to your door for a tactile inspection.
A detailed digital soft proof goes out before any order at MCC Wedding Invitations Provo. This essential verification step is included at no extra charge to protect your investment. Send us your Canva file and our team will check it for free, usually within a few hours.
Conclusion
Avoiding the 7 common Canva wedding invitation printing mistakes ultimately comes down to preparing your digital file correctly before hitting download. A beautifully designed card deserves to look just as stunning on physical paper as it does on your screen.
Always double-check your bleed margins, verify your photo resolution, and ensure your color profiles match commercial printing standards.
Taking a few extra minutes to configure these settings will save you hundreds of dollars in reprint costs. If you want absolute peace of mind, reach out to a professional Provo printing partner to run a preflight check on your artwork today.


Janet Barton
Owner & Lead Designer
Owner of MCC Wedding Invitations, helping Provo couples and BYU brides create affordable, personalized wedding invitations.
About JanetReady to get started with your wedding invitations?
Get a Quote